

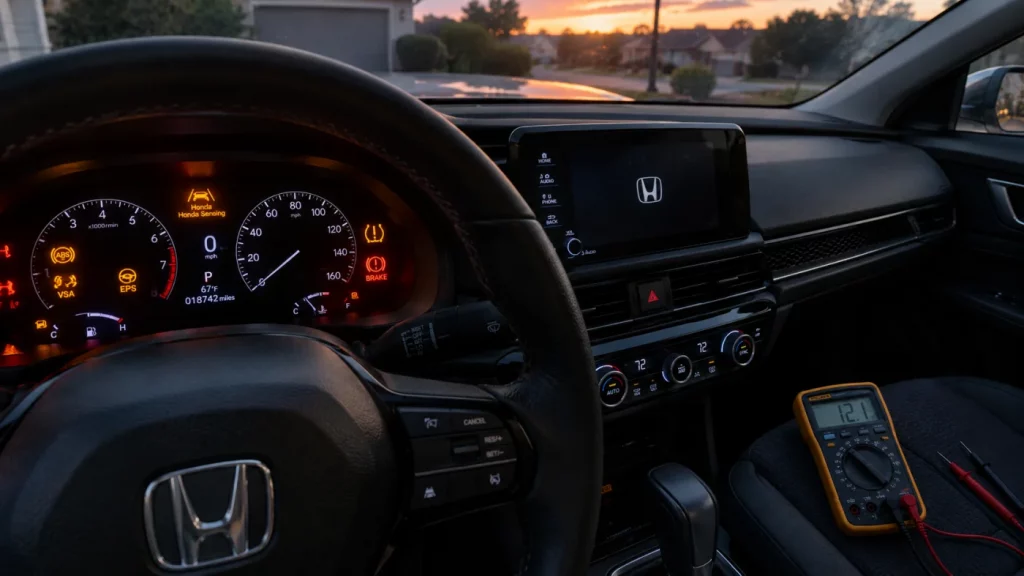
It was a Tuesday morning in November, and my 2022 Civic Sport was sitting in the driveway with more warning lights on than a Christmas tree. ABS, VSA, EPS, Honda Sensing — all of them lit up at once. The car had 38,000 miles on it. I had owned it since new. I had done every oil change on time. And now it looked like the entire electrical system had decided to quit on the same day.
I did what most people do first: I panicked. Then I opened the Honda Civic forums and started searching. Then I panicked again.
This is the story of how a dying 51R battery in an 11th-gen Civic threw every warning light in the cluster — and how replacing it made all of them disappear in under twenty minutes.
But this is not just a story. It is a diagnostic approach. Because the most important thing I learned is not that the battery fixed my car. It is that I almost spent $1,200 on an ABS module before I checked the simplest thing first.
If your 10th or 11th-gen Civic lights up with ABS, VSA, EPS, Honda Sensing, and other warnings simultaneously, the most likely cause is a failing 51R battery. Modern Hondas are extremely sensitive to voltage fluctuations. When the battery can no longer hold a stable charge, the ECU and individual modules throw fault codes at the same time. Before you spend money on diagnostics, have the battery load-tested. A replacement 51R battery — Group Size 51R, typically $150–$220 — resolves the issue in many cases. This is not a guaranteed fix for every Christmas tree. It is the first thing you should rule out.
1. The Christmas Tree Happened
The first thing I noticed was the dash. Not one light. Not two. All of them.
ABS. VSA. EPS. Honda Sensing. The Tire Pressure Monitor. The brake system warning. The orange steering wheel icon. The collision mitigation system. The road departure mitigation system. Every icon that could possibly illuminate was illuminated.
The car started. It drove. But it drove like it was confused — the steering felt heavy, the throttle response was hesitant, and the dashboard looked like a slot machine that had hit the jackpot.
My first thought was that something catastrophic had happened. A failed ABS module. A bad Wheel Speed Sensor. A problem with the electric power steering rack. Any of those would have been expensive. The ABS module alone is a four-figure part on these cars.
My second thought was that I had done something wrong. I had recently installed a dash cam and hardwired it to the fuse box. Maybe I had tapped the wrong circuit. Maybe I had blown a fuse. Maybe I had damaged something.
I disconnected the dash cam. The lights stayed on.
Here is the important point: multiple warning lights do not necessarily mean multiple failed components. In a modern Honda, one underlying problem can trigger a whole group of warnings. The dashboard tells you where the system noticed a problem. It does not always tell you what caused it.
2. Why the Dashboard Looks So Bad
Modern Civic systems constantly communicate with each other. The ABS module talks to the VSA system. The VSA system talks to the EPS system. The EPS system talks to the Honda Sensing suite. They all share the same CAN bus network.
When system voltage drops or becomes unstable, multiple control modules can set faults at the same time. One low-voltage event can cause the ABS module to set a code, the VSA system to set a code, the EPS system to set a code, and Honda Sensing to go offline. The result is a dashboard that looks like everything has failed.
But in reality, nothing has failed. The modules are simply reacting to unstable voltage. This is where the “Christmas Tree” nickname comes from. It looks catastrophic. It is usually not.
| Warning Light | What It Monitors | Why It Triggered |
|---|---|---|
| ABS | Anti-lock braking system | Low voltage caused module to set a fault |
| VSA | Vehicle stability assist | Lost communication with ABS module during voltage drop |
| EPS | Electric power steering | Reduced assist due to unstable voltage |
| Honda Sensing | Camera and radar safety systems | Shut down to protect hardware from voltage fluctuations |
| Brake System | Brake fluid level and system pressure | False trigger from voltage instability |
| TPMS | Tire pressure monitoring | Module reset due to low voltage |
3. The First Reaction: Don’t Start Replacing Parts
I spent the next two hours reading forum threads. If you have ever owned a modern Honda, you know the pattern. You find a thread with the exact same symptoms. You read twenty replies. Someone says it is the ABS module. Someone else says it is a wheel speed sensor. Someone else says it is a software glitch and you need to disconnect the battery for thirty minutes. Someone else says their car did the same thing and it turned out to be a bad ground.
Then you find a thread where someone says: “Check your battery.”
And you think: “My battery is fine. The car starts.”
That is the trap. Modern Hondas do not behave like older cars. In an older Civic — say, a 6th or 7th gen — a weak battery gives you slow cranking, dim headlights, or a no-start condition. You know it is the battery because the car tells you it is the battery.
In a 10th or 11th gen Civic, the battery can be weak enough to cause system-wide electrical chaos while still starting the car. The engine cranks. The car drives. But the voltage is not stable enough for the sensitive electronics that run the safety systems. And when those systems lose stable voltage, they all throw codes AT the same time.
So here is what not to do:
- Don’t immediately assume the ABS module, EPS rack, VSA system, or Honda Sensing hardware has failed.
- Don’t clear the codes repeatedly without finding the cause.
- Don’t start buying expensive sensors based solely on the dashboard warnings.
Start with the 12-volt electrical system. It is the foundation that everything else depends on.
Pro tip: The warning light tells you where the system noticed a problem. It doesn’t always tell you what caused it. A low-voltage event can trigger codes in five different modules without any of those modules being defective.
4. Check the Battery Before Anything Expensive
Before I bought anything, I did a series of basic checks. These are the same checks you should do before you spend money on diagnostics or parts.
Battery age: Check the date code on the battery. Most batteries have a sticker on the top or side that shows when it was manufactured. A battery that is more than three years old is suspect. A battery that is more than four years old is on borrowed time. My 51R was original to the car and had been in service for three years and eight months.
Resting voltage: Use a multimeter to check the battery voltage with the engine off. Set the multimeter to DC volts. Touch the red lead to the positive terminal and the black lead to the negative terminal. A healthy battery should read 12.6 volts or higher. If it reads 12.4 volts, it is partially discharged. If it reads below 12.2 volts, it is significantly discharged. My battery read 12.1 volts.
Voltage while starting: This is where a weak battery reveals itself. Connect the multimeter to the battery terminals and watch the voltage while someone cranks the engine. A healthy battery should not drop below 10.5 volts during cranking. If it drops below 10 volts, the battery is weak. If it drops below 9 volts, the battery is failing. I did not have a helper that day, so I used a multimeter with a min/max recording function. The minimum voltage during cranking was 9.4 volts.
Charging voltage: With the engine running, check the voltage at the battery terminals. It should read between 13.5 and 14.5 volts. If it reads below 13.5 volts, the Alternator is not charging properly. If it reads above 14.8 volts, the voltage regulator is overcharging. My charging voltage was 14.2 volts, which is within spec.
Loose terminals: Check the battery terminals for looseness. A loose terminal can cause voltage fluctuations that mimic a failing battery. Grab the terminal and try to twist it. If it moves, it is loose. Tighten it with a 10mm wrench.
Corrosion: Check the terminals for white or blue powdery residue. This is corrosion, and it can prevent the battery from delivering full current. Clean it with a mixture of baking soda and water. Use a terminal brush to clean the inside of the cable ends.
Battery condition after sitting overnight: If the battery is weak, it may read lower in the morning than it did the night before. This is a sign that something is drawing power when the car is off, or that the battery is not holding a charge. Let the car sit overnight. Check the voltage in the morning before you start it. If it has dropped significantly, you have a parasitic draw or a failing battery.
The key idea: A weak 12-volt battery can create a surprisingly large number of unrelated-looking warnings. Check it first.
Battery Age
Check the date code. More than three years old is suspect. More than four years old is on borrowed time.
Resting Voltage
Should be 12.6 volts or higher with the engine off. Below 12.4 volts indicates partial discharge.
Cranking Voltage
Should not drop below 10.5 volts during cranking. Below 10 volts indicates a weak battery.
Charging Voltage
Should be 13.5–14.5 volts with the engine running. Outside this range indicates alternator or regulator issues.
Terminal Condition
Check for looseness and corrosion. Clean and tighten as needed.
Overnight Voltage Drop
If voltage drops significantly overnight, you have a parasitic draw or a failing battery.
5. The 51R Battery
The 10th and 11th-gen Civic use a Group Size 51R battery. This is a relatively small battery. It is not the same as the Group 35 or Group 24F that you find in larger Hondas. It is a compact unit designed to save weight and fit in the engine bay.
The problem is that the 51R has a limited reserve capacity. It is adequate for normal use. But it does not have much margin for error. Add a dash cam, a phone charger, an aftermarket stereo, or any other parasitic draw, and the battery works harder than it was designed to. Over time, it loses capacity. And when it loses enough capacity, the voltage becomes unstable under load.
That instability is what triggers the warning lights. The ABS module, the VSA system, the EPS system, and the Honda Sensing suite all monitor voltage. When voltage drops below a certain threshold — even momentarily — they set fault codes. And because they all share the same CAN bus network, one fault can cascade into multiple warnings.
The car is not broken. The battery is tired.
Why does a battery still start the engine while being too weak to keep system voltage stable?
Because starting the engine requires a short burst of high current — typically 300 to 500 amps for a fraction of a second. A weak battery can still deliver that burst if it has enough cold cranking amps. What it cannot do is maintain stable voltage for the sensitive electronics that run continuously while you drive.
The ABS module, the VSA system, the EPS system, and the Honda Sensing cameras and radar all draw power constantly. They need a stable 12-volt supply. When the battery is weak, voltage fluctuates. And when voltage fluctuates, those systems interpret it as a fault condition.
The car starts. The car drives. But the car is not happy.
Age and repeated short trips make this worse. If you drive five miles to work and five miles home, the battery never gets a full charge. The alternator charges at a variable rate, and short trips do not give it enough time to bring the battery back to 100%. Over months and years, the battery slowly sulfates and loses capacity.
Cold weather makes it worse. A battery that is marginal in summer may fail in winter. Cold temperatures reduce the battery’s ability to deliver current. If your Christmas tree appears on the first cold morning of the year, the battery is the prime suspect.
Accessories and electrical load make it worse. Dash cams, radar detectors, phone chargers, aftermarket stereos, and anything else that draws power puts additional strain on the battery. If you have added accessories, your battery is working harder than the factory design intended.
| Battery Type | Group Size | Typical Lifespan | Notes |
|---|---|---|---|
| Flooded lead-acid (stock) | 51R | 3–4 years | Least expensive, most common |
| AGM | 51R | 4–6 years | Better vibration resistance, more expensive |
| Enhanced flooded (EFB) | 51R | 4–5 years | Middle ground, good for start-stop systems |
6. What the Scan Tool Told Me
Before I replaced the battery, I connected a scan tool and read the codes. This is where the real diagnostic work happens. A scan tool does not just tell you what is wrong. It tells you where to look.
Here is how to approach codes on a modern Honda:
Scan all available modules, not just the engine ECU. The engine ECU is only one of many modules in the car. The ABS module, the VSA module, the EPS module, the Honda Sensing camera, and the body control module all store their own codes. If you only scan the engine ECU, you will miss the codes that matter.
Distinguish low-voltage and communication codes from genuine component failures. A code that says “lost communication with ABS module” is not the same as a code that says “ABS module internal failure.” The first code suggests a voltage or network problem. The second code suggests a hardware problem. Look at the code descriptions carefully.
Look at when the codes occurred. Most scan tools record a freeze frame or snapshot of the conditions when the code was set. If all the codes were set at the same time — during cranking, for example — that points to a voltage issue. If the codes were set at different times, that points to separate problems.
Don’t confuse a stored code with proof that the corresponding component is bad. A stored code means the module saw something it did not like. It does not mean the module is defective. A low-voltage event can set codes in five different modules without any of those modules being bad.
The warning light tells you where the system noticed a problem. It doesn’t always tell you what caused it.
On my car, the scan tool showed codes in the ABS module, the VSA module, the EPS module, and the Honda Sensing camera. All of the codes were set at the same time. All of them were low-voltage or communication codes. None of them indicated a hardware failure.
That was the clue. Multiple modules, same time, low-voltage codes. The problem was not in the modules. The problem was in the power supply.
Pro tip: If you do not own a scan tool, many auto parts stores will scan your car for free. Ask them to scan all modules, not just the engine ECU. Write down the codes and look them up before you spend money on parts.
7. Replacing the Battery
Replacing the battery in a 10th or 11th-gen Civic is a straightforward job. It takes about fifteen to twenty minutes with basic hand tools. You do not need to remove the wheel or access anything from underneath. The battery is right there in the engine bay.
Tools you need:
- 10mm wrench or socket
- 12mm wrench or socket (for the hold-down bracket)
- Memory saver (optional but recommended)
- Terminal brush (optional but helpful)
Step 1: Confirm the replacement battery is the correct size and specification. The 11th-gen Civic uses a Group Size 51R battery. Do not buy a different group size. It will not fit properly. Check the cold cranking amps (CCA) rating. The stock battery is typically rated around 410 CCA. An upgrade to a higher CCA battery is fine, but do not go lower.
Step 2: Shut the vehicle down properly. Turn off the car and remove the key. Make sure all accessories are off. Close the doors. Wait a few minutes for the modules to go to sleep.
Step 3: Disconnect the negative terminal first. Use the 10mm wrench to loosen the nut on the negative terminal. Pull the cable away from the battery and tuck it aside so it does not accidentally touch the terminal. Always disconnect negative first. This prevents short circuits.
Step 4: Disconnect the positive terminal. Loosen the 10mm nut on the positive terminal and pull the cable away. Tuck it aside as well.
Step 5: Inspect the terminals. While the cables are off, inspect the terminals and the cable ends for corrosion. Clean them with a terminal brush or a mixture of baking soda and water. A clean connection is a good connection.
Step 6: Remove the hold-down bracket. The battery is secured by a metal bracket at the base. Use the 12mm wrench to remove the bolts holding the bracket in place. Set the bracket and bolts aside where you will not lose them.
Step 7: Lift the battery out. The 51R battery weighs about 30 pounds. Lift it straight up and out of the tray. Be careful not to tip it. If it has been in the car for a while, it may be stuck to the tray. Gently rock it back and forth to break it free.
Step 8: Install the new battery. Place the new 51R battery in the tray with the terminals in the same orientation as the old one. Reinstall the hold-down bracket and tighten the bolts.
Step 9: Connect the positive terminal first. This is the reverse of removal. Connect the positive cable first, then the negative cable. Tighten the terminal nuts firmly but do not overtighten. You want a snug connection, not a stripped stud.
Step 10: Start the car and allow the systems to initialize. Start the engine. Watch the dashboard. Some warning lights may remain on initially. This is normal. The modules need to see stable voltage and complete a self-test before they will clear the faults.
Do not make this sound like a guaranteed DIY reset procedure for every Civic configuration. Battery replacement procedures and post-replacement initialization can vary. Some cars may require a battery registration procedure to tell the charging system that a new battery has been installed. Check your owner’s manual or consult a dealer if you are unsure.
Before You Buy a Battery
Load-test the old one first. Most auto parts stores do this for free. Do not replace a battery that is still healthy.
Do Not Skip the Hold-Down Bracket
A loose battery can shift and short against the Hood or chassis. Always reinstall the bracket and tighten it properly.
Consider an AGM Battery
AGM (Absorbed Glass Mat) batteries are more resistant to vibration and have better cycling durability. They cost more but last longer.
Check the Date Code
Never buy a battery that has been sitting on the shelf for more than six months. Check the sticker on the top or side of the case.
8. The Moment the Christmas Tree Disappeared
After I installed the new battery, I started the car. The dashboard lit up for a moment — all the same lights — and then they went out. One by one. ABS. VSA. EPS. Honda Sensing. The brake warning. The tire pressure monitor. Every single one of them cleared.
I sat there for a minute, waiting for them to come back. They did not.
I took the car for a short drive. The steering felt normal again. The throttle response was sharp. Honda Sensing came back online. The dashboard was dark — the way it should be.
The codes cleared themselves after a short drive. The cluster went completely dark again.
If codes remain after replacing the battery, scan again rather than assuming the battery did not solve the problem. Some codes may need to be cleared manually with a scan tool. Others may clear on their own after a few drive cycles. If the same codes return, the problem is not the battery.
9. When a New Battery Does NOT Fix It
This section is critical for credibility. A battery replacement fixed my Christmas tree. It does not mean every Christmas tree is a bad battery.
If the lights remain after replacing the battery, here is what to check next:
- Scan the car. Read the codes again. Look for codes that indicate a genuine component failure, not a low-voltage event.
- Check the charging system. With the engine running, the battery should read between 13.5 and 14.5 volts. If it does not, the alternator or voltage regulator may be failing.
- Check the grounds. A loose or corroded ground can cause voltage fluctuations that mimic a bad battery. Check the ground strap from the battery negative terminal to the chassis. Check the ground from the engine to the chassis. Clean and tighten as needed.
- Inspect the battery terminals. Even a new battery can have a bad connection. Make sure the terminals are clean and tight.
- Check for ABS, VSA, and EPS-specific faults. If the codes point to a specific component — a wheel speed sensor, a Steering Angle Sensor, an ABS module — then that component may actually be faulty.
- Investigate wheel-speed sensors. A failing wheel speed sensor can trigger ABS and VSA warnings. A scan tool can tell you which sensor is reporting erratic data.
- Investigate communication faults. If the codes indicate a CAN bus communication problem, there may be a wiring issue or a failing module.
- Perform a proper diagnostic. Do not repeatedly replace batteries. If the problem persists, find a shop that understands modern Honda electrical systems and have them diagnose it properly.
Important: Do not clear the codes repeatedly without finding the cause. Clearing codes without fixing the underlying problem will just make the lights come back. And it may erase freeze-frame data that a technician could use to diagnose the issue.
10. What I Would Check First on an 11th-Gen Civic
If your 11th-gen Civic lights up like a Christmas tree, here is the order I would follow:
- Battery. Check age, resting voltage, cranking voltage, and charging voltage. Load-test if necessary.
- Terminals. Check for looseness and corrosion. Clean and tighten as needed.
- Charging voltage. Confirm the alternator is charging between 13.5 and 14.5 volts.
- Scan all modules. Read codes from every module, not just the engine ECU. Look for low-voltage and communication codes.
- Clear and verify codes. If the codes are low-voltage codes and the battery is weak, replace the battery and clear the codes. Drive the car and see if the codes return.
- Investigate persistent faults. If the codes return after a new battery, diagnose the specific fault. Check grounds, wheel speed sensors, and module communication.
That gives you a practical takeaway rather than just a story. Start with the basics. Rule out the simple things first. Do not let the dealership charge you a hefty diagnostic fee right off the bat.
11. 10th Gen vs 11th Gen
The same diagnostic principle applies to both generations. The 10th-gen Civic (2016–2021) and the 11th-gen Civic (2022–present) both use the 51R battery. Both are sensitive to voltage fluctuations. Both can throw a Christmas tree of warning lights when the battery gets weak.
The specific warning lights may differ slightly. The 11th-gen has a newer Honda Sensing suite with more features. The 10th-gen has an older version. But the underlying behavior is the same: when voltage drops, multiple modules set faults at the same time.
So if you have a 10th-gen and you see the Christmas tree, the same advice applies. Do not panic. Do not start replacing modules. Start with basic electrical checks.
Modern Honda electronics can turn one voltage problem into a dashboard full of warnings. The generation does not matter. The diagnostic approach does.
12. Final Takeaway
If your 11th-gen Civic suddenly lights up like a Christmas tree, do not assume you have lost five systems at once. Check the 12-volt battery and charging system before you start replacing expensive parts.
And importantly: a battery replacement fixed my Christmas tree. It does not mean every Christmas tree is a bad battery.
That last distinction is important. If you replace the battery and the lights go away, great. If you replace the battery and the lights come back, you have a different problem. Scan the car. Check the charging system. Check the grounds. Diagnose the actual fault.
But start with the battery. It is the most common cause. It is the cheapest thing to check. And it is the thing most likely to be overlooked.
FAQ — 11th-Gen Civic Christmas Tree Dashboard
Why did all my dashboard lights come on at once?
On 10th and 11th-gen Civics, a common cause is a failing 51R battery. When voltage becomes unstable, the ABS, VSA, EPS, and Honda Sensing systems can all set fault codes simultaneously. This is a known behavior of the electrical architecture, not a defect. However, it is not the only possible cause. A proper diagnosis is always recommended.
Can a bad battery cause the Christmas tree effect even if the car starts?
Yes. Starting the engine requires a short burst of high current. A weak battery can still deliver that burst while failing to maintain stable voltage for the sensitive electronics that run continuously. The car starts, but the safety systems shut down.
How do I test my battery?
Use a multimeter to check resting voltage. A healthy battery should read 12.6 volts or higher with the engine off. If it reads below 12.4 volts, it is partially discharged. Have it load-tested at an auto parts store for a definitive answer.
What battery does a 10th or 11th-gen Civic use?
Both generations use a Group Size 51R battery. This is a compact unit with limited reserve capacity. It is adequate for normal use but has less margin for error than larger batteries.
Should I replace the battery myself or take it to a shop?
You can replace it yourself with basic hand tools. The job takes about twenty minutes. Disconnect the negative terminal first, then the positive. Remove the hold-down bracket. Lift out the old battery. Install the new one. Connect positive first, then negative.
Will the lights go away immediately after replacing the battery?
In many cases, yes. The warning lights may clear as soon as the new battery is installed and the car is started. Some systems may require a short drive cycle to fully reset. If the lights persist, the problem may not be the battery.
What if the lights come back after replacing the battery?
Check the alternator output. With the engine running, the battery should read 13.5–14.5 volts. If it does not, the alternator may be failing. Also check for parasitic draw, loose ground connections, and any available software updates. Scan the car for specific fault codes.
How long does a 51R battery last?
Typically three to four years in a 10th or 11th-gen Civic. Hot climates and frequent short trips shorten lifespan. AGM batteries tend to last longer than flooded lead-acid batteries.
Can I use a larger battery?
The battery tray in the 10th and 11th-gen Civic is designed for a 51R. A larger battery may not fit without modification. Stick with the correct group size.
Do I need a memory saver when changing the battery?
Not required, but convenient. A memory saver preserves radio presets, clock settings, and idle relearn data. Without one, the car will relearn on its own within a few drive cycles.