

1996 – Present
12V Charging System · ELD · Battery Current Sensor
13.5 – 14.5 V (14.2 V optimal)
Below 13.0 V · Above 14.8 V
Under 50 mA (sleep mode)
ELD failure · Battery Current Sensor · Bad ground
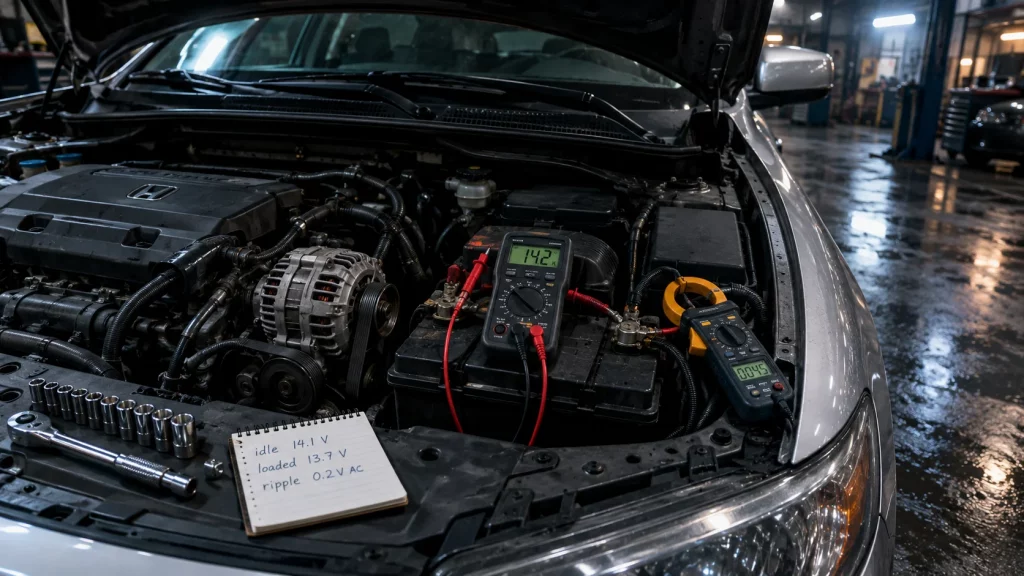
A healthy Honda Civic charging system holds 13.5–14.5 V AT the battery terminals with the engine running. 14.2 V is optimal. Below 13.0 V means the Alternator is not charging the battery. Above 14.8 V means the voltage regulator is overcharging. But the alternator is not always the culprit. On 7th and 8th gen Civics, the Electronic Load Detector (ELD) can fail without setting a code and mimic a dead alternator. On 10th and 11th gen Civics, a failed Battery Current Sensor does the same thing. Test with a multimeter before replacing anything. A $40 sensor is often the real fix — not a $400 alternator.
Introduction: Why Civic Charging Issues Get Misdiagnosed
A Honda Civic that won’t start, dims its headlights at idle, or kills a new battery every few months usually gets one of two responses from owners: replace the battery, or replace the alternator. Both are expensive. Both are often wrong.
Here is the typical sequence. The car doesn’t start. The owner replaces the battery. The car starts. A week later, it doesn’t start again. The owner replaces the alternator. The car starts. Two weeks later, the same problem. By this point, the owner has spent $600–$1,200 and still doesn’t have a working car — because the real cause was never the alternator or the battery.
The Civic charging system is more complex than it looks. From the 7th generation onward, Honda introduced electronic load management. The ECU actively controls alternator output based on electrical demand. This system saves fuel and extends alternator life, but it also introduces failure points that don’t exist on older cars. An Electronic Load Detector (ELD) or a Battery Current Sensor can fail silently, and the car behaves exactly like the alternator is dead.
This guide covers how the Civic charging system actually works, how to test it in 10 minutes with a multimeter, what the voltage numbers mean, the generation-specific failure points that cause misdiagnosis, and what a real repair costs in 2026.
Core rule: Test the charging voltage at the battery terminals with the engine running before replacing anything. A reading below 13.0 V confirms a charging problem. It does not confirm the alternator is the cause.
Symptoms — When to Start Testing
Charging system problems show up in a predictable order. Early symptoms are easy to ignore. Late symptoms leave you stranded.
| Symptom | What It Means | First Test |
|---|---|---|
| Battery warning light on | Charging voltage is below the threshold, or the alternator has stopped charging | Charging voltage at idle |
| Slow crank / hard start | Battery is partially discharged — either a weak battery or the alternator isn’t recharging it | Resting voltage + cranking voltage |
| Dim or flickering lights at idle | Charging voltage drops under load. Often a bad ground or a failing ELD | Charging voltage under load |
| Electrical accessories misbehaving | Radio resets, EPS warning, gauge flicker. Low or unstable voltage | Charging voltage + AC ripple test |
| Battery dies overnight | Not a charging problem — this is a parasitic drain | Parasitic draw test (separate procedure) |
| New battery dies within weeks | Either the alternator isn’t charging, or something is draining the battery | Charging voltage, then draw test |
| Whining or grinding from engine bay | Alternator bearing failure, or a slipping/glazed serpentine belt | Visual inspection + belt tension |
| Burning smell near alternator | Overheating alternator — often from a failing diode or overloaded circuit | AC ripple test + charging voltage |
If the battery light comes on while driving: turn off every non-essential electrical load immediately — A/C, rear defroster, heated seats, radio, phone chargers. The car is now running on battery power alone. A healthy battery can carry the car for 20–50 miles depending on load and battery condition. Drive to the nearest safe location. Do not continue driving with the light on and all accessories running — the ECU, EPS, and ignition will shut down without warning when voltage drops below the threshold.
How the Civic Charging System Works
The Basic Circuit
The alternator is driven by the serpentine belt (or a dedicated V-belt on older Civics) and produces AC current, which is rectified to DC by an internal diode bridge. The voltage regulator — internal on all modern Civic alternators — controls the field current to hold system voltage between roughly 13.5 and 14.5 V.
That voltage does three things: recharges the 12V battery, powers the ECU and sensors, and runs the lights, HVAC, and infotainment. If voltage drops below about 12.5 V while the engine is running, the battery is no longer being charged — it is being drained.
The chain of components: Belt → Alternator → Voltage Regulator → Battery → Terminals → Grounds → ECU → Electrical Loads. A failure anywhere in this Chain produces the same symptom: low charging voltage. Testing the whole chain, not just the alternator, is what separates a correct diagnosis from a parts cannon.
What Changed With the ELD System (7th Gen Onward)
Starting with the 7th generation Civic (2001–2005), Honda introduced the Electronic Load Detector (ELD). The ELD is a current sensor built into the Underhood Fuse Box. It monitors how much electrical load the car is drawing and sends that information to the ECU.
The ECU then tells the alternator how much voltage to produce. When electrical demand is low — daytime driving, no A/C, no rear defroster — the ECU reduces alternator output to save fuel. When demand rises, it increases output. This is why a modern Civic alternator does not always produce 14.2 V. It produces what the ECU asks for at that moment.
Key consequence: A Civic with the ELD system can show a “low” voltage reading at idle in mild conditions without anything being wrong. That is normal ECU behavior — not a failing alternator. Load the system (headlights, A/C, rear defroster) before drawing conclusions.
Battery Current Sensor (10th and 11th Gen)
On 10th (2016–2021) and 11th (2022+) generation Civics, Honda added a Battery Current Sensor mounted on the negative battery cable. It measures current flowing in and out of the battery and reports to the ECU. The ECU uses this data to control charging voltage — the same idea as the ELD, implemented with a different sensor.
The Battery Current Sensor fails more often than most owners expect. When it does, charging voltage stays low, the battery drains, and no check engine light appears. Replacing the alternator does not fix it — because the alternator was never the problem.
Charging Voltage Cheat Sheet — What the Numbers Mean
Measure at the battery terminals with the engine running, engine warm, no accessories on. Then measure again at 2,000 RPM with headlights, A/C, and rear defroster on. All values below are general Honda Civic references — verify the exact range for your generation in the factory service manual.
| Charging Voltage (Engine Running) | Condition |
|---|---|
| 14.2 V | OPTIMAL |
| 13.5 – 14.5 V | NORMAL |
| 13.0 – 13.5 V | WEAK CHARGE — load the system and retest |
| Below 13.0 V | ALTERNATOR NOT CHARGING |
| Below 12.5 V | SYSTEM IS DRAINING THE BATTERY |
| Above 14.8 V | OVERCHARGE — voltage regulator failure |
Resting Voltage (Engine Off)
| Resting Voltage (Engine Off, 2+ Hours) | Battery State |
|---|---|
| 12.6 V or higher | FULLY CHARGED |
| 12.4 V | PARTIALLY DISCHARGED |
| 12.2 V | DISCHARGED |
| Below 12.0 V | DEEPLY DISCHARGED — may not recover |
Critical distinction: Resting voltage and charging voltage are two different measurements. A car can have a fully charged battery (12.6 V resting) and a dead alternator at the same time. If charging voltage is below 13.0 V, the battery will drain even if it started the car this morning.
10-Minute Charging System Test
You need one tool: a digital multimeter. A $20 unit is enough. If you want to go further, add an amp clamp for parasitic draw testing and a battery load tester for the battery itself.
Step 1 — Resting Voltage
Engine off, headlights off, doors closed. Multimeter across battery terminals. Record the reading. Target: 12.6 V or higher.
Step 2 — Cranking Voltage
Watch the multimeter while someone cranks the engine. Should not drop below 10.5 V. Below 10.0 V indicates a weak battery or high-resistance cables.
Step 3 — Idle Charging Voltage
Engine running at idle, no accessories on. Target: 13.5–14.5 V. Below 13.0 V: charging problem. Note: an ELD-equipped Civic may show 12.5 V at idle with no load — this can be normal.
Step 4 — Loaded Charging Voltage
Headlights on, A/C on max, rear defroster on, engine at 2,000 RPM. Voltage should stay above 13.2 V. A drop below 13.0 V under load confirms a weak alternator or a failing ELD/sensor.
Step 5 — Voltage Drop Test
Measure between alternator output post and battery positive terminal while running. Should be under 0.3 V. Higher means a bad cable or connection, not a bad alternator.
Step 6 — Ground Side Drop
Measure between alternator case and battery negative terminal. Should be under 0.1 V. Higher means a bad engine ground strap.
Step 7 — AC Ripple Test
Set multimeter to AC volts. Measure at battery terminals with engine running. Under 0.5 V AC is normal. Above 1.0 V AC indicates a failed diode in the alternator rectifier bridge.
Step 8 — Parasitic Draw Test
Only needed if the battery drains while parked. Multimeter in series with negative cable, all doors closed, key off, after sleep mode. Target: under 50 mA.
Diagnostic Decision Table
Once you have the measurements, use this table to interpret them. It maps the reading to the most likely cause and the next test to run.
| Measurement | Most Likely Cause | Next Test |
|---|---|---|
| Charging voltage below 13.0 V at idle and under load | Alternator, wiring, or ELD/sensor fault | Voltage drop test, then alternator bench test |
| Charging voltage fine at alternator, low at battery | Bad cable or connection | Voltage drop test on positive and ground side |
| Charging voltage above 14.8 V | Voltage regulator failure | Replace alternator or regulator |
| AC ripple above 1.0 V AC | Diode bridge failure inside alternator | Alternator replacement or rebuild |
| Charging voltage fine, but battery still dies overnight | Parasitic drain — not a charging problem | Parasitic draw test (fuse pull method) |
| Charging voltage low, alternator tests good on bench | ELD (7th/8th gen) or Battery Current Sensor (10th/11th gen) | Scan tool live data, sensor replacement |
| Cranking voltage below 10.0 V, resting voltage normal | High-resistance cable or failing starter | Cable voltage drop test |
| Resting voltage below 12.2 V | Battery is discharged — charge and retest | Load test after full charge |
Battery Testing — Before You Blame the Alternator
A battery that reads 12.4 V on your multimeter may still fail a load test. Voltage alone does not tell you how much current the battery can deliver. That matters, because a weak battery can drag charging voltage down and make a healthy alternator look bad.
| Test | What It Measures | Target |
|---|---|---|
| Resting voltage | State of charge | 12.6 V or higher |
| Cranking voltage | Battery’s ability to deliver starting current | Above 10.5 V during crank |
| Load test (battery tester) | Real-world cold cranking amps under load | Above 70% of rated CCA |
| Battery age check | Service life remaining | 3–5 years typical, replace after 4 if marginal |
| Terminal inspection | Corrosion, looseness, resistance | Clean, tight, no white or blue powder |
| Battery Current Sensor (10th/11th gen) | Signal integrity to ECU | Live data — should vary with load |
Replace the battery if: it is over 4 years old and any test is marginal. Do not replace the battery if: it is under 2 years old and tests healthy — the problem is elsewhere.
Generation-Specific Failure Points
6th Generation (1992–2000)
No ELD system. The charging circuit is conventional — alternator, regulator, battery, cables. Common failures:
- Alternator diode failure — produces AC ripple that interferes with the ECU. Can cause a Battery Drain overnight even with the key off.
- Worn alternator brushes — cause intermittent charging. Voltage drops under load or when hot.
- Bad engine ground strap — corroded ground between engine block and chassis. Causes low charging voltage and slow cranking.
- Starter brush pad wear — documented case of a 1998 Civic drawing 3.5 A at rest and draining the battery in 2–3 hours. Starter rebuild solved it.
7th Generation (2001–2005) — ELD Introduction
The 7th gen introduced the ELD. Failure points specific to this generation:
- ELD failure without a code — the ELD can fail silently and cause unstable charging voltage. The ECU doesn’t set a check engine light because the sensor is still reporting a value — just a wrong one.
- Stuck brake light switch — keeps the brake lights on, drains the battery through the brake circuit.
- Overhead map light switch — stays partially on and draws current without being visible in daylight.
- Aftermarket alternators — poor charging performance. Some rebuilt units don’t match the OEM output curve.
8th Generation (2006–2011) — ELD Bypass Trap
The 8th gen has the most documented cases of misdiagnosis on the charging side. The critical issue:
- Aftermarket radios and amplifiers wired directly to the battery bypass the ELD. The ELD doesn’t see the extra draw, so the ECU doesn’t tell the alternator to increase output. The battery gradually discharges over weeks. This is documented across 8thCivic forum threads — owners replaced multiple alternators before finding the real cause.
- Starter parasitic draw — a 2011 Civic owner traced a persistent drain to the starter. Rebuilt starter solved it.
- Glove box and trunk lights — switches that stay closed can draw current continuously. Not visible during the day.
- R18 engine mounts — not a charging issue, but the hydraulic passenger-side mount collapsing can cause vibration that some owners misdiagnose as a failing alternator bearing.
9th Generation (2012–2015)
Charging system failures on the 9th gen are less common than on the 7th and 8th gen, but parasitic drains are still widely misdiagnosed. A 2012 Civic owner reported that the car wouldn’t start after sitting 3–4 days. The dealer recommended a trickle charger instead of finding the actual draw. The real fix was identifying the drain — not masking it with a charger.
10th and 11th Generation (2016–Present) — Battery Current Sensor
The 10th and 11th gen Civics use a Battery Current Sensor mounted on the negative battery cable. It measures current in and out of the battery and reports to the ECU. The ECU then adjusts charging voltage accordingly.
Failure symptoms:
- Battery repeatedly dies even after replacement
- Charging voltage stays low (below 13.0 V) even under load
- No check engine light — the sensor reports a plausible value, just a wrong one
- AGM Battery upgrade does not fix the problem
The Battery Current Sensor costs approximately $40–$80. Replacing it often restores correct charging behavior. Many owners replace alternators and batteries before finding this part.
Important: On 10th and 11th gen Civics, always test the Battery Current Sensor output (via scan tool, if available) before replacing the alternator. A sensor reading that stays flat under changing loads indicates the sensor has failed.
Voltage Drop Test — The Test That Saves You From a $400 Mistake
Most alternators that get replaced “because the battery keeps dying” are actually fine. The problem is resistance in the cables or grounds. A voltage drop test finds that resistance in minutes.
Positive Side Drop
Multimeter set to DC volts. One probe on the alternator output post, the other on the battery positive terminal. Engine running, all accessories on. Reading should be under 0.3 V. Higher = bad cable or connection.
Ground Side Drop
One probe on the alternator case, the other on the battery negative terminal. Engine running, all accessories on. Reading should be under 0.1 V. Higher = bad engine ground strap or corroded ground point.
Battery Cable Drop
Measure across the positive cable from battery to starter, then from battery to chassis ground. Under 0.2 V on each. Higher = replace cable.
Terminal Drop
Measure from battery post to cable end on both positive and negative. Should be 0.0 V. Any reading above zero indicates corrosion or a loose connection.
How to use the results: If charging voltage is low at the battery but normal at the alternator, the alternator is fine — the cable or ground is the problem. This is the single most common misdiagnosis on Civic charging systems.
Alternator vs Regulator vs Wiring — Who Is Actually at Fault?
| Test Result | Probable Cause | Next Step |
|---|---|---|
| Low charging voltage at alternator and battery | Alternator or regulator failure | Bench test alternator, replace if failed |
| Good voltage at alternator, low at battery | Cable or connection resistance | Voltage drop test, replace cable |
| Charging voltage above 14.8 V | Voltage regulator fault | Replace alternator (regulator is internal) |
| AC ripple above 1.0 V AC | Diode bridge failure | Replace or rebuild alternator |
| Alternator tests good, sensor data flat | ELD or Battery Current Sensor failure | Replace sensor, retest charging voltage |
| Charging fine, battery drains parked | Parasitic drain | Draw test, not a charging repair |
| Charging fine, battery weak under load | Battery is at end of life | Load test, replace battery |
| Intermittent low voltage, no pattern | Loose ground, failing brush, or heat-related fault | Inspect grounds, test hot and cold |
Parasitic Drain vs Charging Problem — Do Not Confuse Them
A Civic that won’t start after sitting overnight has one of two problems. Either the charging system isn’t recharging the battery while driving, or something is draining the battery while parked. These are two different diagnostics, and treating one as the other wastes money.
| Scenario | Likely Problem | Test |
|---|---|---|
| Battery dies overnight, charging voltage is normal | Parasitic drain | Draw test — multimeter in series, pull fuses |
| Battery dies over several days, charging voltage low | Charging system | Charging voltage test, alternator check |
| Battery dies within hours, heavy draw suspected | Parasitic drain, likely over 1 A | Draw test — will kill a battery in days |
| Battery dies after 1–2 weeks of short trips | Undercharging from short trips | Charging voltage test at 2,000 RPM |
| Battery dies only in winter | Combination — weak battery + short trips + cold capacity loss | Load test, then consider battery maintainer |
Rule of thumb: Under 50 mA is normal sleep current. Between 50 mA and 100 mA is suspicious. Above 1 A will kill a battery in days. If you have a drain, do not replace the alternator — find the circuit drawing current and fix that.
Repair Costs by Generation (2026)
| Repair | DIY Parts | Independent Shop | Dealer |
|---|---|---|---|
| Alternator replacement (6th–8th gen) | $120–$220 | $350–$600 | $700–$1,100 |
| Alternator replacement (9th–11th gen) | $200–$350 | $500–$800 | $900–$1,400 |
| Alternator rebuild (6th gen) | $80 | $250–$450 | — |
| Electronic Load Detector (7th/8th gen) | $40–$80 | $150–$300 | $300–$500 |
| Battery Current Sensor (10th/11th gen) | $40–$80 | $150–$250 | $250–$450 |
| Battery (Group 51R) | $150–$220 | $250–$400 | $350–$500 |
| Battery (H5-AGM, 10th/11th gen) | $200–$300 | $320–$500 | $450–$650 |
| Serpentine belt | $25–$60 | $120–$250 | $200–$350 |
| Battery cables (positive or negative) | $30–$100 | $150–$300 | $300–$500 |
| Diagnostic at a shop | — | $80–$150 | $120–$200 |
Pro tip: On most Civic generations, the alternator is accessible from the top of the engine bay. The 8th gen Si and the 10th/11th gen 1.5T require removing the serpentine belt, upper radiator hose, and one Engine Mount bolt in some configurations. Budget 1.5–3 hours for a DIY replacement.
Alternator Replacement — New, Remanufactured, or Aftermarket?
| Type | Price Range | When It Makes Sense |
|---|---|---|
| New OEM (Honda) | $350–$600 | Long-term ownership, high-value car, keeping OEM reliability |
| Remanufactured (Denso, Bosch) | $180–$320 | Best balance of price and reliability. Denso is the OEM supplier. |
| Aftermarket (generic) | $120–$200 | Budget repair, short-term ownership. Risk of regulator mismatch and premature failure. |
| Rebuild your own | $80–$150 in parts | You have the tools and time. Not practical for most owners. |
Warning: Civic ECUs are sensitive to voltage regulator behavior. Some cheap aftermarket alternators produce unstable voltage that triggers check engine lights, EPS warnings, or Honda Sensing faults. If you plan to keep the car, use OEM or a reputable remanufactured unit. Denso and Bosch both make reliable alternatives.
What to Check After Installing an Alternator
Charging Voltage at Idle
Should read 13.5–14.5 V. Below 13.0 V means the new alternator is not charging correctly, or a connection is still bad.
Charging Voltage Under Load
With headlights, A/C, and rear defroster on at 2,000 RPM, voltage should stay above 13.2 V.
Battery Light Off
If the battery light is still on after replacement, the problem is likely in the control circuit or the sensor — not the alternator.
AC Ripple
Should stay under 0.5 V AC. Higher means the new alternator also has a bad diode — rare but possible on cheap units.
Belt Tension
Check the serpentine belt tension and alignment after installation. Slipping belt mimics a bad alternator.
Drive Cycle
Drive for 10–15 minutes. Some ECUs need a drive cycle to relearn voltage compensation and clear stored codes.
What to Replace First — The Correct Order
One of the biggest wastes in charging system repair is replacing parts in the wrong order. This sequence avoids that.
- Battery — test resting voltage, cranking voltage, and load capacity. Replace only if weak or over 4 years old.
- Terminals — clean and tighten. Loose or corroded terminals cause voltage drop that mimics a bad alternator.
- Belt — check tension and condition. A slipping belt causes intermittent charging failure.
- Charging voltage — measure at idle and under load. This tells you whether the alternator is working.
- Voltage drop — if the alternator is good but the battery voltage is low, test cables and grounds.
- Alternator — replace only if all of the above check out and the alternator fails a bench test.
- ELD / Battery Current Sensor — on generations that use them, test the sensor before replacing the alternator.
- Parasitic draw — if the battery dies while parked and charging is normal, this is the problem to solve — not the alternator.
Prevention & Maintenance
- Test charging voltage every 30,000 miles or once a year after the third year of battery service.
- Keep battery terminals clean and tight. Apply dielectric grease to prevent corrosion.
- Inspect the serpentine belt for cracks or glazing at every oil change after 60,000 miles.
- Drive the car weekly for at least 30 minutes at highway speed to let the alternator fully recharge the battery.
- If aftermarket accessories were installed (radio, amplifier, dash cam hardwired, remote start), verify they don’t bypass the ELD on 7th/8th gen Civics. On 10th/11th gen, verify they don’t draw current when the car is off.
- Do not replace the alternator without testing the ELD or Battery Current Sensor first on the generations that use them.
- Keep the engine bay clean. Some Civic alternators sit low and collect road debris and moisture, which accelerates brush and bearing wear.
FAQ
What is the normal charging voltage for a Honda Civic?
Between 13.5 V and 14.5 V with the engine running. 14.2 V is optimal. Below 13.0 V indicates the alternator is not charging. Above 14.8 V indicates overcharge from a failed regulator.
Why does my Civic charging voltage stay low at idle?
The ELD system (7th gen onward) reduces alternator output at idle when electrical demand is low. This is normal. Load the system — headlights, A/C, rear defroster — and check voltage again at 2,000 RPM. If it rises above 13.5 V, the system is working.
How do I know if the alternator or the battery is bad?
Test charging voltage with the engine running. If it reads above 13.5 V, the alternator is charging. A no-start condition with a healthy charging voltage is usually a weak battery or a Parasitic Drain. If charging voltage is below 13.0 V, the charging system is the problem.
What is the Electronic Load Detector (ELD) on a Civic?
A current sensor in the underhood fuse box that monitors electrical load and tells the ECU how much voltage the alternator should produce. It was introduced on the 7th gen (2001–2005). A failed ELD can cause low or unstable charging voltage without setting a check engine light.
Can a bad Battery Current Sensor cause charging problems on a 10th gen Civic?
Yes. On 10th and 11th gen Civics, the Battery Current Sensor measures current flow and reports to the ECU. A failed sensor can prevent the alternator from receiving the signal to charge at the correct voltage. The part costs $40–$80 and is a common misdiagnosis point.
How much does a Civic alternator replacement cost?
Depends on generation. 6th–8th gen: $350–$600 at an independent shop. 9th–11th gen: $500–$800. Dealer rates push total costs to $700–$1,400. DIY parts are $120–$350 depending on generation and whether you use OEM or rebuilt.
Can a bad alternator drain the battery overnight?
Yes. A failed alternator diode bridge can leak current from the battery to ground even with the key off. This is one of the documented parasitic drain sources on 6th gen Civics. If a battery drains overnight and the alternator tests normally when running, test for AC ripple and for drain with the alternator disconnected.
What does AC ripple voltage mean on a Civic alternator?
AC ripple is the residual AC voltage left after the alternator rectifies current to DC. Set a multimeter to AC volts and measure at the battery terminals with the engine running. Should be under 0.5 V AC. Above 1.0 V AC indicates a failed diode in the alternator rectifier bridge.
Why does my Civic battery keep dying even after replacement?
The most common causes are: (1) parasitic drain, (2) failed Battery Current Sensor (10th/11th gen), (3) failed ELD (7th/8th gen), (4) aftermarket accessories wired directly to the battery bypassing the ELD, (5) loose or corroded terminals, (6) failing alternator diode. Test each in that order before replacing the battery again.
How do I test the charging system on a Civic with a multimeter?
Four measurements: (1) resting voltage with the engine off — target 12.6 V; (2) cranking voltage — should not drop below 10.5 V; (3) idle charging voltage — target 13.5–14.5 V; (4) loaded charging voltage at 2,000 RPM with headlights, A/C, and rear defroster on — should stay above 13.2 V. Below 13.0 V under load confirms a charging problem.
Can I drive with the battery light on?
Yes, but only for a limited distance. Once the battery light is on, the car is running on battery power alone. Turn off all non-essential electrical loads immediately. A healthy battery can carry the car for 20–50 miles. Drive to the nearest safe location and do not continue driving with the light on and accessories running.
What causes a Civic alternator to fail early?
Common causes: (1) oil or power steering fluid leaking onto the alternator, (2) overheating from a slipping belt or blocked airflow, (3) failed voltage regulator or diode bridge, (4) worn brushes at high mileage, (5) cheap aftermarket alternator with poor regulator behavior.
Do I need to disconnect the battery before replacing the alternator?
Yes. Always disconnect the negative battery terminal first. This prevents short circuits and protects the ECU and other electronics during the repair. Some generations require a memory saver to preserve radio presets and ECU idle relearn data — check the service manual for your Civic.
What if charging voltage is fine but the battery still dies?
The problem is a parasitic drain, not the charging system. Test parasitic draw with a multimeter in series between the negative battery post and the negative cable. Target is under 50 mA after all modules go to sleep. If the reading is higher, pull fuses one at a time to identify the circuit drawing current.